Installation
You install the plugin as usual through the plugins page.
Before we start with settings and editing the menu here are some points to remember regarding the plugin.
- The menu uses an open source code from https://adobe-accessibility.github.io/Accessible-Mega-Menu/ You can fork the oroginal code here
- This code is responsible for the accessibility and the drop down of the menu panels. You can read in the previous link about how accessibility is implemented if you wish to know more about it.
- In the plugin code I stripped any unnecessary css code which responsible for styling and left bare bones css file just for the needed functionality. All the styling and content of the menu is done in the WP menu editor and css classes that YOU put in your style.css or elsewhere, as long as the code is loaded to the site pages.
- Be careful not to add css classes directly into the plugin’s css file as it will be overwritten on updates and you’ll lose your hard work.
- If you prefer to use your own css file (rather than adding classes to style.css),that’s fine and you can tell the plugin to load your file instead of the original but just make sure to copy the css classes needed for the menu into your file. Otherwise the menu will fail to function. See in the settings section of this documentation about those mandatory classes.
Note: This issue will be changed in future updates of the plugin and those mandatory classes will be able to move to you css file eventually.
Changing the call for menu in header.php
Edit your active theme’s header.php
Replace the call for the menu with the following code:
The red striked out code is a typical theme code for the menu that should be removed or commented. The green code should be added instead.
<?php //wp_nav_menu( array( 'theme_location' => 'primary', 'menu_id' => 'primary-menu' ) );wp_nav_menu( array( 'theme_location' => 'primary', 'menu_id' => 'primary-menu', 'container' => 'div', 'echo' => true, 'items_wrap' => '<div class="megamenu"><ul id="%1$s" class="%2$s">%3$s</ul></div>', 'container_class' => 'LayoutGrid LayoutCenter PanelDiffuseShadow PanelFillExtraLight', 'menu_class' => 'atr_accessible_megamenu', 'walker' => new atr_advanced_menu_walker()) ); ?>
Save it.
Settings the plugin
The settings page for the ATR AM is in Appearance > Atr Advanced Menu Options
CSS file url
Empty or URL, (optional), default: empty
This textbox may consist a url to a css file that holds the styling classes you have to control the menu design.
If you put these classes in your style.css file, just leave this empty.
You must provide the css design somewhere in your theme or elsewhere.
The ATR AM gives you the framework for managing the menu content. It does not style the menu at all. That is by design. I wanted to give users of the plugin as much as possible freedom to do whatever they want with the menu of their site.
We have a simple dark skin (a css file) that you can experiment with here and and a light one here.
You can upload any of them to your server and call it from this textbox.
I’ll provide more skins in the future.
Do not load any CSS file
checkbox yes/no, (optional), default: unchecked
Check this if you want to avoid loading extra file (megamenu.css) to your site pages.
Important! If you check this box you must include some basic CSS classes in your theme for the menu to work properly. See what is mandatory for the menu to work here.
Icon font URL
A url to an icon font file (optional), default: empty
Note: You don’t have to define icon font here if you have no intention to use one.
One of the options in the menu items edit form is a graphic element that is attached to the menu item. See use case here. Icon from icon font file is one of the options.
This option is labeled “Item image from CSS” in the menu item edit form under “Select item image” option.

If your site already loads icon font file for other design purposes just get this file url and paste it here. In this case it will serve only to display the selected icon for you in the menu item edit form like the screen capture above. (See also next section regarding this)
If no icon font is already loaded in the frontend files, than you can load it through the plugin by writing its url here.
Example: https://maxcdn.bootstrapcdn.com/font-awesome/4.5.0/css/font-awesome.min.css will use Font Awesome.
I load icon fonts for frontend elsewhere
checkbox yes/no, (optional), default: unchecked
This option let you define that your icon font will be loaded by the plugin only for the menu editor.
You should check this box if you already load the icon font with your theme or any other method for the site frontend. The purpose of this option is to avoid double loading of the same file in the frontend while still letting you see the icons in the menu edit page (if you wrote the font icon url in previous section).
Menu panel default css class
empty or class name, (optional), default: “atr-am”
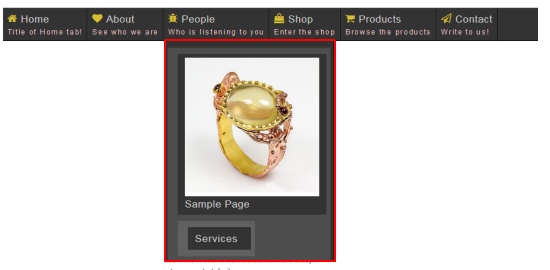
The default class for the Mega Menu panels. A “panel” here (and throughout this documentation) is the whole element that is opened when you hover over a top level item of the menu.The panel is marked here with red frame.
This class will be added to all panel elements and its purpose is to give you a choice of common css identifier for all panels in the menu.
You should notice that in the menu editor you can add another unique class to certain panel (discussed later in the menu editor guide and in the styling guide) which will be added to this class and the hardcoded “accessible-megamenu-panel” class.
I.e. if you write here a class named “my-panels” and in the menu editor in one of the top items item’s “Panel class” field you write a class name “products-panel”, the final class set of the panel will be “my-panels products-panel accessible-megamenu-panel”.
In this case “my-panels” and “accessible-megamenu-panel” classes will be part of all the panels, while “products-panel” will be part of only the top level menu item you wrote it in the menu editor.
This option gives you the ability to control the style of all panels while the “Panel class” field in the menu editor gives you control of single panel. This is an important hint to remember while styling the menu.
Menu items css class prefix
empty or class prefix, (optional), default: “atr-am”
Write a css class prefix for the menu items.
The prefix is needed to single out your ATR AM classes from optional conflicts with other site css classes. If you will not write a css class prefix here, the default theme menu classes (if are exist) might affect your design and it will be difficult for you to override them.
Display in style edit mode
checkbox yes/no, (optional), default: unchecked
For development only: Check this if you want the dropdown panel of the menu to stay open after the mouse is out of the top level items.
It is much more easy when editing the CSS of the menu in Chrome developmer tools or in firebug.
Just don’t forget to uncheck it when you’re done editing the css file.